{ Happy Sewing } … Little Backpacks Tutorial
Should be organizing, making lists, trying to switch gears to be ready for a new school year. My disorganized self still has oodles of books, pencils, crayons … you name it, to buy. So, why not procrastinate with the necessities just a bit longer and instead make a few easy, cute, soft backpacks for gym clothes instead? I’m in!
What I Used:
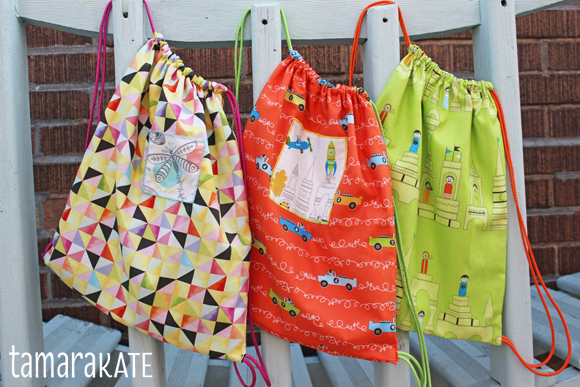
– One 13″ wide x 30″ long piece of fabric for exterior. Note, if your print is a directional one, like the Monsieur Blocks green bag, you will want instead two pieces 13″ wide x 15½” long so that one side of your bag doesn’t have upside down little men or castles on it.
– One 13″ x 30″ piece of fabric for lining. This could be a basic solid colour fabric, but I prefer the added little surprise for the recipient of having a contrasting lining.
– Three meters of cording or soft (but strong) ribbon. A not-too-wide gros grain would work well.
What I Did:
Unless otherwise indicated, all seam allowances are ¼”.
If you have two pieces of exterior fabric, place them right sides together with both prints facing the top, and stitch across the bottom 13″ with a ½” seam.
If you are going to add any decorative patches or stitching to the front, now is the time to do it. I centred the patches I used horizontally and placed them about 6″ from the top. On the Scribble Cars orange bag I used a small narrow zigzag machine stitch to attach the patch. On the Faceted Flight triangle print, I embroidered the patch on with small buttonhole stitching.
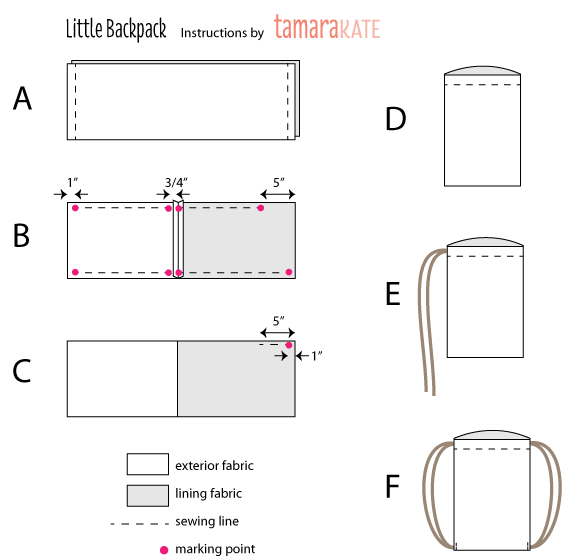
Here are the visuals for the following instructions:

Right sides together, place lining fabric on exterior fabric and sew two short ends (see A). You should have a tube.
Keeping right sides together, arrange the tube so that those 2 seams you just made are lined up in the centre. Mark 1″ from each end on each side, except on one lining end, mark about 5″ from the end (to turn fabric right side out). Also mark centre seam and ¾” from centre seam on each side of exterior fabric (to pass the cord). Sew from each mark to the next along the long sides (4 lines of stitching in total) (see B).
Turn fabric right side out. Top stitch 5″ opening to 1″ from folded edge (see C).
Insert lining into exterior fabric. Sew all the way around top, ¾” from folded edge to form casing (see D).
Cut cording or ribbon in half. If using cording, lightly scorch ends with a flame to stop them from unravelling. Using a safety pin or bodkin, insert one end into one side of casing and pass it all the way through to exit at the same edge (see E). Repeat with other side.
Insert ½” of 2 cord or ribbon ends into the 1″ opening left at the bottom edge of the bag, passing through opening in lining as well. Top stitch the opening a few times. Repeat with other side.
All done!


23 Comments
Brooke
August 21, 2013love ’em!
G'ma
August 22, 2013very cute and even practical!
Lee
August 26, 2013Fabulous tutorial! thank you!
Tamara
August 26, 2013So glad you like them!
Denise
October 23, 2013Thank you! This is perfect for what I need!
Tamara
October 23, 2013Great Denise! Have fun making them!
Kristy
January 31, 2014Thank you so much! Pinning and sharing, this tutorial is perfect for the charity sewing project we are currently working on at Hopeful Threads!
Tamara
January 31, 2014Thanks Kristy.
Kristin
January 31, 2014Beautiful! I would love to make these backpacks for my children.
Thank you for all that you do!
Pinned!
K-
Tamara
January 31, 2014Thanks Kristin!
cal
May 27, 2014So nice! Love the patch detail. Will try my hand at one of these!
Kim Guthrie
May 27, 2014You really need to stop putting such cute and easy things to sew on your website…I am getting BACKED UP!!! I love all the projects and would love to (and NEED) some basket liner ideas and patterns. How about it???
Fingers crossed about the Beach sew thing…hoping to meet you in person. (I want to see if your fingers look like mine…HA!)
Kim
Kerry
May 28, 2014Brilliant. Can you clarify please if when you do the channel but do you sew each end where the tie goes to prevent them looking ugly?
Joyce
September 8, 2014Love this. I made 6 of them today for my Operation Christmas Child shoeboxes. Thanks for the easy to follow tutorial.
Monique Thomas
October 11, 2014I love this and your instructions are so easy to follow. I’m definitely going to make one of these …. or two, or three! Thanks for sharing.
Monique Thomas
October 14, 2014I am making one of these and just have a quick question before I start. When you insert the ends of the cord into the opening at the bottom of the bag including the lining opening, when you open up the bag you obviously see the cord coming through at the bottom. I was just wondering if I closed up the lining completely, ie. didn’t leave the 1″ gap for the cord to go through and therefore just inserted the cord through the exterior opening, would that be ok? I’m just wondering if there is a reason why you put it through the exterior and lining, does it make it stronger? Thank you. I love your website.
Tamara
October 15, 2014Hi Monique,
I put the cording through the 2 layers to make it stronger. If it’s just through the outer layer, it may pull too much on the fabric & if it’s a very lightweight one, I fear it may rip. I also feel the bag will hang better and have better structure with it through the 2 layers. Hope that’s clear. Let me know if you have any further questions.
Happy sewing,
Tamara
Donna
May 30, 2015The perfect “little dude backpack” for a last minute gift today! Thank you so much for posting this!!!
Tamara
May 30, 2015Hope the little dude loves it, Donna!
Camille
June 25, 2015Tamara,
This is a great bag and your directions are easy to follow. I finished 1 of 24 that I’m doing and I have a question about how to finish the ends of the cord channel so that they don’t fray. Am I missing something. That space is the perfect size for my cording, but the open ends of the channel move and fray. Any tips.
Tamara
June 25, 2015Hi Camille, I understand what you mean. A solution would be as follows: Before starting step A, turn under 1/4″ along the 2 long sides of your exterior fabric & top stitch it in place for only 1″ at each end of each side. A second line of stitching just securing the fabric that is turned under should ensure no fraying. Proceed with step A. When you get to step B, you’ll probably have to stop stitching a bit shy of the 3/4″ mark in the centre (to accommodate the folded fabric, but that should be fine.
Please let me know if this works for you.
Lucy
July 28, 2015please can you tell me what size cord you used. Thanks
Tamara
July 29, 2015Hi Lucy, It’s only slightly thicker than 1/8″ in diameter & pretty flexible. I don’t think it’s too critical the size, once it’s not too large & stiff. Hope that helps.