{ Happy Sewing } … Monsieur Pocket Pillow Tutorial
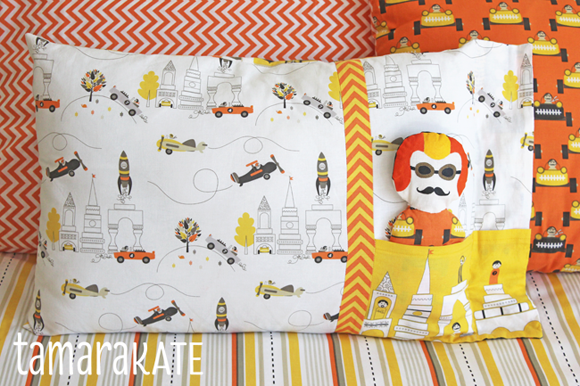
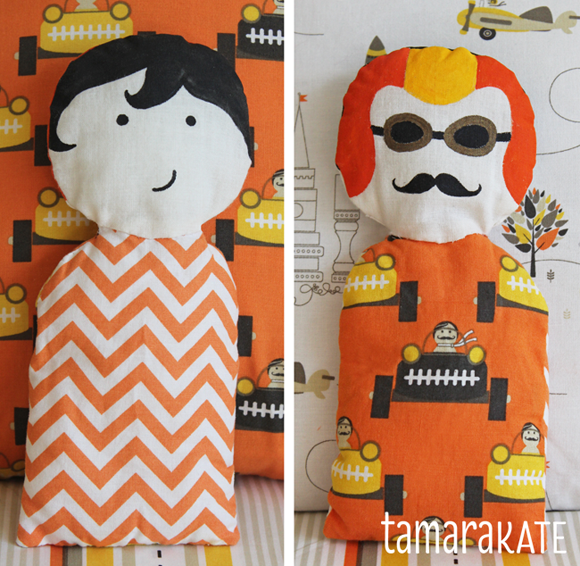
My son loves arranging things (pillows, stuffed animals, etc) on his bed and he’s been asking for a personalized pillow for some time now. My Les Monsieurs fabric line offered the perfect inspiration. I decided to be really playful with the personalization aspect, and created a soft 2-sided doll. One side is Max today, the other side is his dream of being a race car driver/pilot.
What I used:
A 16″ x 24″ pillow insert (available at IKEA). The finished pillow will be smaller than this, resulting in a nice full pillow rather than a floppy one.
Fabric pieces that can all be cut from a fat quarter of each of the following prints from the Aviator colourway (letters refer to diagrams & tutorial instructions):
B – Castle Blocks
C – Tire Treads (orange)
D – Monsieur Blocks
E – Tire Treads (yellow)
F – Gentlemen Start Your Engines
A 4.5″ x 9″ scrap of natural cotton
A bit of extra stuffing (I used fiber fill) for the doll
White thread
Acrylic or fabric paints and a few paint brushes in varied sizes
What I did:
I used 1/2″ seam allowances everywhere.
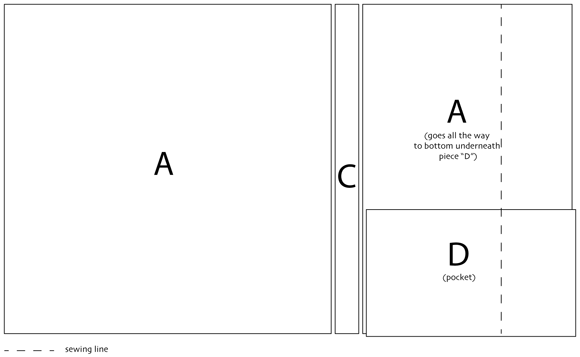
First, cut pieces for the front of the pillow as follows:
A – 25.5″ wide x 15″ high. Then cut this piece vertically 15″ from left edge. You will have 2 pieces (one 15″ x 15″, and another 10.5″ x 15″), with the pattern continuing across them.
C – 2″ wide x 15″ high
D – 10.5″ wide x 6.75″ high
Here is a diagram for placement:
For the pocket, fold under 1/4″ along the top edge of D, toward the wrong side of the fabric, then fold again 1/2″ down. Sew a line 3/8″ from the folded edge. This creates the finished edge of the pocket.
Place D on top, all the way to the bottom, of the smaller piece A, lining up bottom and side edges. (Wrong side of D against the right side of A). Pin in place. Now position C on top of these two, right sides together,along the left edge. Pin and sew from top to bottom. Open and iron seam toward C. Position larger piece A on C, right sides together, along the left edge. Sew from top to bottom. Iron seam toward C.
Now cut your pillow back, B, 25.5″ wide x 15″ high. With right sides together, place B on pieced-together front, matching edges. Pin and stitch all the way around, leaving an opening along the right side large enough to insert the pillow. Clip corners and turn right-side out. Insert pillow. Using an invisible stitch, close the opening. Push the pillow all the way to the left of your cover and machine stitch a line from top to bottom about 2.5″ from the cover’s right edge to create a decorative flange.
For the doll, cut one piece each 6″ high x 4.5″ wide from fabrics E and F. Using the following diagram as a guide, cut the top corners to form rounded shoulders.
Cut 2 circles with a 4.5″ diameter from the natural cotton. Now the fun part … the personalization. Keeping in mind your 1/2″ seam allowance, use a pencil to draw a simplified version of your boy’s face and one of the imaginary race car driver/aviator on your circles. Below you can find a bit of visual inspiration. It’s really not hard, just stick to basic shapes to mimic hair style, add a few small circles for eyes and a little mischievous grin.

Now the paint. Use a test scrap of fabric first to get the feel of the paint. You really don’t want to use much water, as that will cause your paint to bleed on the fabric. Just fill in the shapes you have drawn and co-ordinate the helmet colours with the fabrics. Let them completely dry.
Clip the curves at the neck edge of the face so that you are able to turn the seam allowance to the back smoothly. Using an invisible stitch, sew the neck edge of the head to the top of the body. Repeat for other side. Right sides together, sew the doll front to the back, leaving an opening at the base. Clip curves and turn right side out. Stuff and close the bottom with an invisible stitch.
Place the monsieur in his pocket and you are all done!




6 Comments
Brooke
August 12, 2013What an adorable project!! You have come up with some wonderful and creative ways to use your fabric lines!! Hooray!
Tamara
August 13, 2013Thanks Brooke!
Debbie Rogowski
August 12, 2013this is just adorable. I might just have to find a little boy to make this for.
Tamara
August 13, 2013So glad you like it Debbie!
Cecilia
August 13, 2013This is adorable. I wish I had a grandson to make one for. I love your fabrics, my grown son would have loved this when he was young.
Tamara
August 13, 2013Thanks for the sweet comment Cecilia!